Strips are the visual building blocks of your schedule in Think Crew. Each strip represents a breakdown (or multiple breakdowns), displaying key information in a customizable format. Creating well-designed strips helps your production team quickly identify and understand schedule elements at a glance.
Getting Started with Strip Creation #
- Navigate to Strip Design:
- Choose your project and go to the Schedules page
- Open the schedule by clicking on the name
- In the top menu, select “Manage / Designs”
- Click on the “Strips” tab
- Create a New Strip:
- Click the “New” button
- Name your strip based on its purpose (e.g., “Scene Strip,” “Cast Strip”)
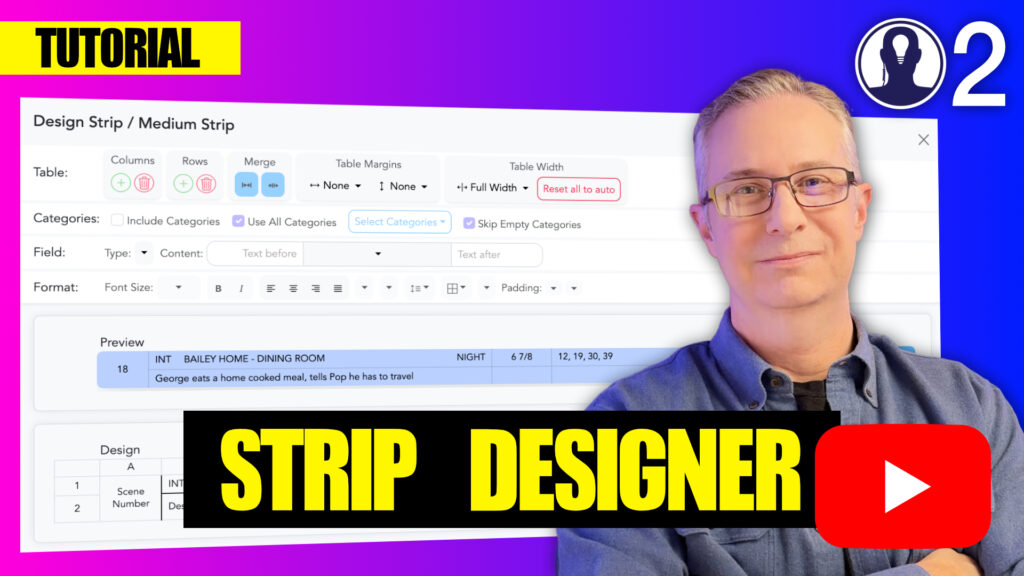
Designing Your Strip #
To enter the strip designer, click on the “Edit this strip design” button from any strip
The strip editor provides several tools to customize how your strips appear:
Strip Layout Options:
- Table: Organize information in a table format with rows and columns
- Categories: Add category information to your strip
- Fields: Include custom fields and data points relevant to your production
- Format: Adjust colors, fonts, borders, and other visual elements
Content Placement:
- Select an available cell and then make any changes you’d like in the above menus.
- Merge cells together, to modify your design to suit your needs.
- Resize and position rows and columns to create your ideal layout
Strip Preview and Testing #
As you build your strip, use the preview feature to see how it will appear with actual data. This helps you refine your design before applying it to your production schedule. Consider the following when testing your strip:
- Is the most important information immediately visible?
- Does the strip remain readable with different amounts of text?
- Are colors and contrast sufficient for easy reading?
- Does the strip design work well at different zoom levels?
Once you’re satisfied with your strip design, save it to make it available for use in your production schedule. You can create multiple strip designs for different element types, giving you a comprehensive visual system for your production planning.
Here is a video that covers creating a strip: